Push notification in swift using firebase How does it works
- An app enables Push Notification in swiftUI. The user has to confirm that he wishes to receive these notifications.
- The app receives a “device token”. You can think of the device token as the address that push notifications will be sent to.
- The app sends the device token to your server.
- When something of interest to your app happens, the server sends a push
- notification to the Apple Push Notification Service, or APNS for short.
- APNS sends the push notification to the user’s device.
As the user’s IPhone device receives the push notification, it shows an alert popup notification which plays a sound and/or updates the app’s icon. The user is enable to launch the app from the notification alert. The application is given the contents of the push notification and it can be fit to handle it as it sees fit.
Assume that your application is push notification enabled and certificate has been shared to user or provider.
Push Notification in swiftUI
1. Registering Your App with APNs
Communicate with APNs(Apple Push Notification server) and receive a unique device token generated from the device which identifies your app.
As You register your application and the server receives your device token each time your app launches using Apple-provided payload or APIs. The registration process is similar across platforms:
- In iOS and tvOS, call the
UIApplicationto request the device token. Upon successful registration, you receive the token in your app delegate’s - In macOS, call the
NSApplicationto request the device token. Upon successful registration, you receive the token in your app delegate’s
2. Forward Tokens to Your Provider Server
Upon receiving a device token, open a network connection from your app to your provider server. Securely forward the device token of the specific user generated from APNs and any other information that you may need to identify the specific user device at your server.
3. Request Authorization at Launch Time
let center = UNUserNotificationCenter.current()
// permission to show alerts and play alert sounds.
center.requestAuthorization(options: [.alert, .sound])
   { (granted, error) in
      // Enable or disable features based on authorization.
   }
4. Configure Notification Support Based on Authorized Interactions
let notificationCenter = UNUserNotificationCenter.current()

notificationCenter.getNotificationSettings { (settings) in
// Don’t schedule the particular notifications if not authorized.
guard settings.authorizationStatus == .authorized else {return} if settings.alertSetting == .enabled {
// Schedule an notification.
}
else {
// Schedule a notification with a badge and sound.
}
}5. Declaring Your Actionable Notification Types
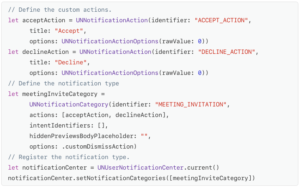
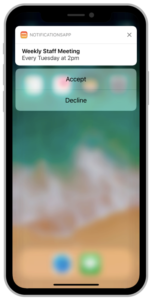
We can Differentiate the notifications and add the particular action buttons to the notification interface.


//HANDLE ACTION EVENT
func userNotificationCenter(_ center: UNUserNotificationCenter,
       didReceive response: UNNotificationResponse,
       withCompletionHandler completionHandler:
         @escaping () -> Void) {
}